Yuja allows users to create audio/video content on their computer and upload it to the Yuja online storage and streaming environment. In addition, the software automatically captions any/all content created. The following is designed to help users create new video content with Yuja.
Topics included within this guide are:
If you need more support with embedding or publishing recorded content to a course channel, please see the Yuja – Embedding Videos into Canvas or Yuja – Getting Started support guides.
NOTE: for more information on the Video Classroom, see the Yuja – Video Classroom support guide.
See attached resource below:
Download TutorialSetting up the Yuja Software Station
The Yuja Software Station is a program you must download to your computer before you can start to record video to Yuja on your computer. This program only needs to be downloaded once, unless you change computers.
The program draws your account information when you login to the Yuja website, or you go through the Yuja link in your Canvas course. At the top of the Media Channel, after you login, is the navigation row (see below).
![]()
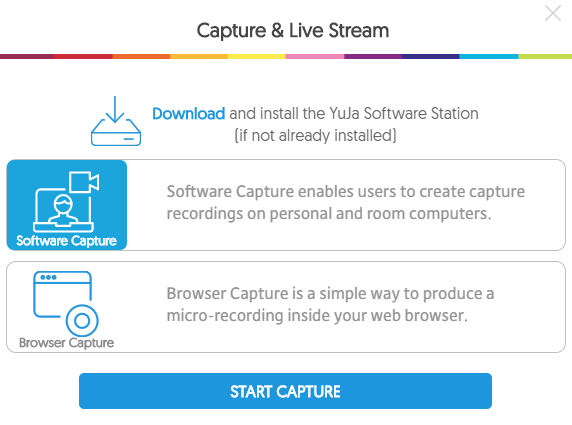
From this row, you will select Create Recording. A new window will appear called Capture & Live Stream (see below). This window contains the following options:
- Download – the download link for the Yuja Software Station
- Software Capture – the capture option that uses the Yuja Software Station
- Browser Capture – the capture option that uses the video classroom (not recommended)
 The Download link downloads the correct installation software version to your computer (Mac or PC, not compatible with Linux). You must open and install the software before you select a capture option.
After the software has been installed, users will return to the Capture & Live Stream window. By default, the software capture is selected. This is the better choice as it provides the best quality video. The Browser Capture is not recommended. To start the recording, click the Start Capture button.
The web browser may prompt you to open the Yuja Software Station. You must click OK, Open, or Allow, to continue with the software capture. The Yuja Software Station will open in a new window (see below).
NOTE: Classrooms with the Cisco equipment do not use capture options on the Yuja website. If you are in one of these rooms, and wish to have your class recorded, please see the Yuja – Classroom Lecture Capture support guide.
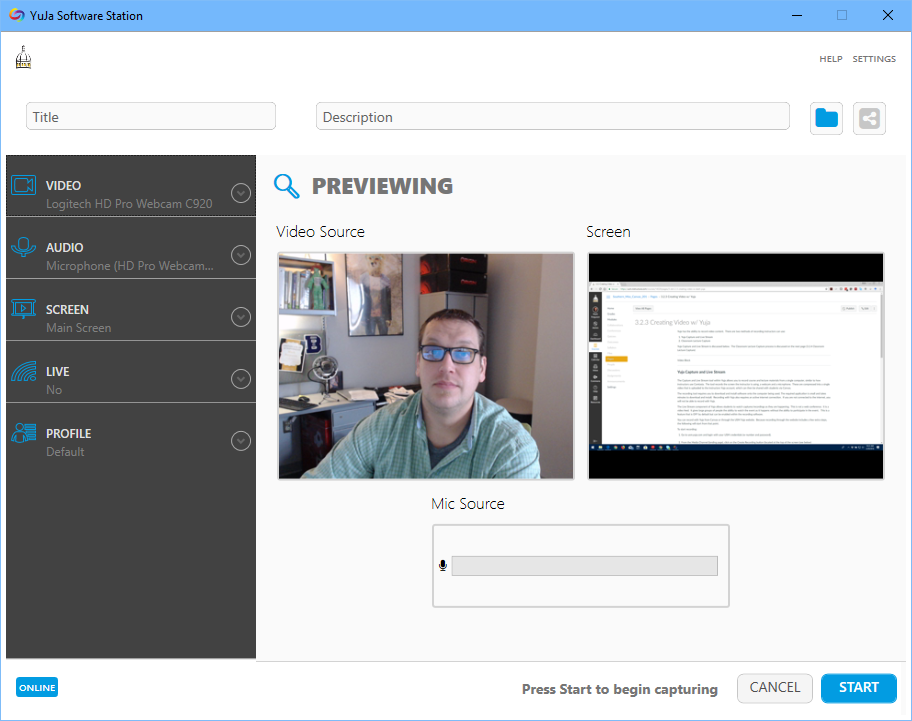
At the top of the Software Station window are text boxes for a video Title and Description. There is also a folder button that allows you to select the location with your Media Library where the video will be stored when finished. At a minimum, you must add a title for your video. If you do not select a storage location, the video will be saved in you Media Library, which you can later move to a specific folder if you choose.
What is being Recorded?
The Yuja Software Station is recording three separate things: the screen, the webcam, and the microphone.
The Screen – The screen is being recorded through a process called Screen Capture. In essence, a video camera is pointed directly at the user’s computer screen and it is only recording that screen. The recording will capture any visual movements or demonstrations but will not record any audio that comes through the computers speakers. For example, if a user wished to record a PowerPoint presentation, he/she will complete the following steps:
- Open the PowerPoint presentation and the Yuja Software Station
- Start the recording
- Start the PowerPoint
- Present the PowerPoint
- Stop the recording
- Save the Video
Any/all visual components of the PowerPoint (i.e., transitions, animations, text, or images) will be recorded. Any audio narrations added directly to a PowerPoint slide will not. If the PowerPoint contains a video, the visual movement of the video will be recorded but the audio associated with the video will not.
The Webcam – Most laptop computers contain webcams built directly into the monitor. The webcam is a simple camera that visually records anything it is pointed at.
The Microphone – Most laptop computers contain a microphone built directly into the monitor. The microphone records any audio it detects. This audio may come from the user speaking, background noise, and/or other people or noises near the computer. Typically, microphones are not sensitive enough the pickup audio coming from the computers speakers. If any computer audio is recorded by the microphone, it is typically of poor quality.
What is not being Recorded?
Any audio that comes through the computers speakers is not being recorded by Yuja. This is called system audio. Examples of system audio would be any notification sounds made by the computer (i.e., new email), any music being played through a streaming service (i.e., Pandora), or any audio from a video being played on the computer.
For example, if an instructor is recording a video and wishes to include a video from YouTube. Yuja will record the visual motion of the video on the user’s screen but it will not record the audio that accompanies the video.
Recording with Yuja
The left column allows users to select the webcam (Video), microphone (Audio), and Screen (Screen) he/she wishes to record for the video. Users may click on any of the rows within that column and change the default options, or add additional options for the video. By default, Yuja is set to record one screen, one microphone, and one webcam. These devices are typically set to the primary devices for your computer. If you have a computer with multiple monitors, the Yuja default is whichever screen is set as Monitor 1. You can set the Yuja Software Station to record up to two screens, microphones, or webcams simultaneously. You would use the left column of the Software Station to make these adjustment before recording by adding, removing, or changing the microphone, webcam, or screen source.
Any active options within the left column are displayed in the Previewing area, to the right of that column (see above). The preview allows users to see what will be recorded prior to starting and ensures all Audio, Video, and Screen hardware are properly working.
The Live option in the left column activates the Live Stream feature of Yuja. This is not a web conference. Rather, it allows students to view the recording as it is happening, like a webinar or live classroom feed. The Live Stream option is disabled by default but can be enabled through the Live option in the left column of the software station.
However, the Live Stream feature must be tied to a Course Channel. The system will not allow instructors to broadcast lectures, or recorded video, to the entire USM student population. It will allow instructors to broadcast recordings to student enrolled within a specific class. The button used to select the course channel is the Share button, located at the top of the software station window next the folder button (see above). After you have selected the course channel and enabled the Live Streaming option, the Live Stream will initialize when you start recording. When the Live Stream is ready, you will be sent an email with a weblink to the video. Students can either access the feed through their Yuja account or you can forward the weblink you received onto them.
When all settings are ready, and the desire devices are displayed within the preview, click Start to begin recording.
![]()
![]() A small control panel will appear in the bottom-right corner of the screen when the recording is on and active, (see right). This allows users to open the software station control panel again, pause the recording, or stop the recording. When a user stops the recording, they have the option of saving the recording to Yuja or deleting it.
A small control panel will appear in the bottom-right corner of the screen when the recording is on and active, (see right). This allows users to open the software station control panel again, pause the recording, or stop the recording. When a user stops the recording, they have the option of saving the recording to Yuja or deleting it.
NOTE: deleted recordings cannot be restored, or “undone”. Saving the recording uploads the recording from your computer to the storage location specified in the software station. If no location was specified, the recording is stored to your Media Library Default Collection folder.
After you click Save, it is important your computer does not lose internet connection for several minutes. The recording is being uploaded to you Yuja account. Once the upload is complete, Yuja will begin processing and auto-captioning the video. You will receive an email to your USM account when the view has finished processing and is ready for students to view. You will receive another email when the auto-captioning has completed.
The amount of time needed to process videos and captioning depends on the length of your video. Typically, Yuja will process one-hour videos within thirty minutes (includes video and captioning processing). Occasionally, a video will experience a problem processing. This is indicated by an hour glass icon rotating over the video thumbnail block in your course channel or media library. If experience a problem with the software station, video recording, or video processing, please contact Mark Ferguson or Susan Rayborn in the Office of Online Learning.