For online students, presentations can be tricky things. If the instructor wants a live presentation, students typically create a slide presentation and present their material through a web conferencing software. However, if the assignment is to record yourself presenting and submit that recording to an online course, that is a bit more difficult. It does not have to be. The following support guide focuses on adding recorded audio, or voice over, to slides within a PowerPoint presentation (to provide that presentation element to the assignment). The guide also demonstrates how students can share these presentations to Canvas without uploading a large PowerPoint file.
Topics included within this support document are:
- How to get a copy of Microsoft Office
- Adding voice over to PowerPoint slides
- Sharing PowerPoint files to Canvas
Getting Microsoft Office
Most college students have created a PowerPoint presentation, or at least understand how to use the software. However, most online USM students do not know they can download the full Microsoft Office Suite for free and use it while they are a student at USM. The software is available for both Mac and PC/Windows and students can install this software on any computer they are able to (personal, work, etc).
To access this software, go to the following website portal.office.com (no www).
The site has a two-stage login process:
- Your username is your w-number in email form (Username: w######@usm.edu)This will direct you to a second username/password box.
- Username: just your w-number (w######)
Password: the same password you use to login to Canvas or SOAR
 This logs you into Office365. Office365 is also your student email account. You can use the same website and login process every time, so it may be worth bookmarking.
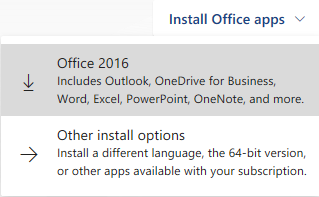
To download your free version of Microsoft Office, click on the Install Office Apps pull-down menu and select Office 2016.
NOTE: Office365 will download the correct version for your operating system (Mac or Windows). Currently, no Linux version of Microsoft Office is available.
A setup file will download onto your computer. Open the file and Office will begin the install process. If you already have Office 2013 for PC/Windows, you do not have update to the latest version to create a PowerPoint with voice over. If you are a Mac user, you are encouraged to update to the latest version of Microsoft Office.
Follow the installation prompts and open PowerPoint when finished.
Adding Voice Over
The first step is to create all visual elements of your presentation. This includes adding any text, images, animations, or transitions to each slide. When creating a presentation, it is best practice not to overload your slides with text and only include images that emphasize what you are presenting.
NOTE: when presenting, do not read directly from the slide. Your text should emphasize the main points of your slide and use the voice over to provide further explanation.
Adding audio to a PowerPoint slide is an old feature, or old technology. The ability to share PowerPoints via the internet is making this old functionality valuable again. Sharing these files is covered in the next section.
 When adding voice over to a PowerPoint slide, it may be helpful to write, or script, what you plan to say before recording. An easy place to do this is in the notes section of the PowerPoint. Notes appears at the bottom of the PowerPoint window below the slide layout (see right). Notes are specific to each slide and you can type any content into the notes section you wish. Notes also save directly to the PowerPoint file, so they may be used if you were to present your PowerPoint in a classroom environment. Script out your presentation by adding notes to each slide.
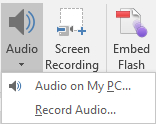 Once you are satisfied with your audio script, return to the first slide. In the navigation row at the top of the screen, click on Insert. Select audio from the tool bar and click on Record Audio from the menu that appears (see right).
A recording panel will appear above your PowerPoint slide. The layout of this panel is very simple, with a play button, stop button, and record button. You can name your recordings, but this is not required.
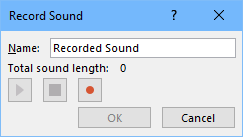 To record your audio, click the record button. The recorder will display a counter showing you how long you have been recording. When done, click the stop button. Click the play button to listen to what you just recorded. If you need to re-record the section, click the record button again. This erases what was previously done and allows you to record a fresh voice over.
If you like the recorded audio, click the OK button and move on to the next slide. Repeat this process for all slides with your presentation.
Again, remember to save.
Sharing the File to Canvas
In the past, all you could do with PowerPoints was upload the full file to an online class. Office365 gives you the ability to store these files online and share them with a web link. The audio voice overs also play in this online environment, which gives people watching the impression of having the material presented to them.
To upload your PowerPoint file to Office365:
- Login to Office365 through portal.office.com (see Creating the Presentation for login instructions)
- Click on the OneDrive tile from the landing page
- At the top of the screen, click Upload and select Files from the menu that appears
- Locate and open your PowerPoint presentation
- In OneDrive, over your mouse pointer over the PowerPoint file name. Click the circle to the left of the file name to select it (see below)

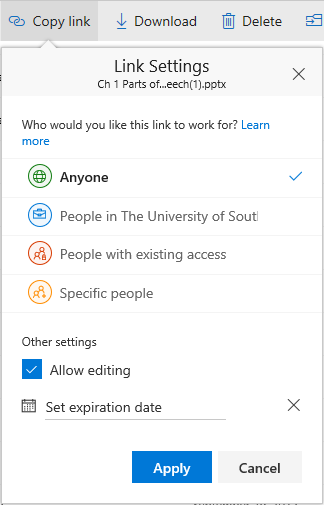 The navigation row at the top of the screen will change. Click Copy Link from the row to create a link to the presentation
- From the menu that appears, click the pull-down that says “Anyone with the link can view and edit”. This is located below the web link
- When the menu expands, uncheck the box next to Allow Editing (see right). This prevents anyone with the link from making changes to your presentation
- Click Apply
- Copy the web link
Once the weblink is copied, you will need to paste that link into Canvas in the location designated by the instructor. If the presentation is going to an assignment, without any classmate interaction, you can still upload the raw PowerPoint file with voice over (and, in some cases instructors may prefer this). However, if the instructor wants you to post the presentation to a discussion board for other students to view, use the weblink technique.