Skype for Business is a chat and web conferencing program every student and instructor has access to at USM. The product is attached to Office 365, which is also known as Golden or your student email accounts. At USM, instructors may use Skype for web conferencing or live classroom sessions. The following guide walks students through setting up Skype on his/her computer, or mobile device, and how students will enter Skype meetings.
Topics included within this guide are:
Skype for Business is a component of Office 365 (O365). Every student, faculty, and staff member of the University of Southern Mississippi has a subscription to Skype for Business through O365. There are three versions of Skype students may use to attending Skype meetings: (1) the computer/desktop application, (2) the web app, or (3) the mobile app. The following sections will describe each version of the tool, the pros/cons, and how to install each version.
See attached resource below:
Download TutorialComputer/Desktop Application
The computer application is the version of Skype attached to Microsoft Office 2013 or newer. However, Skype for Business is not to be confused with regular Skype. Some instructors at USM will use Skype for Business as a way to communicate with students and hold “live” online class sessions, or meetings. Regular Skype cannot access these sessions/meetings. Skype for Business can.
Pros
Students can access “live” sessions, or meetings, from all three versions of Skype for Business. However, most students will only need to use the Web or Mobile app. The computer/desktop does provide features not available through the Web or Mobile apps, but those features are rarely used by students. The computer/desktop app allows students to:
- Create Meetings
- Access/Join Meetings
- Text Chat with other users
- Audio Chat with other users
- Create custom address books (i.e., lists of people)
- See online availability
- Ability to record meetings (PC users only)
Cons
- Installs to a specific computer (i.e., if you change computers, you must install the application again).
- Mac and PC versions are not equal (the PC version has more features)
Installation Instructions
Each student at the University can download the latest version of Office for free from portal.office.com. If they already have office, students can also download Skype by itself from the same site. To get this version of the software:
- Open a web browser and go to office.com
- The username is the user’s W-number (w######) in email form – w#######@usm.edu
- When users try to enter their passwords, they will be redirected to another username/password box specific for the University. Enter the same user name again (w########@usm.edu) and the password used for SOAR.
 Users are then directed to an 0365 landing page with several tiles. In the top-right corner of the page are two install options (see right) – Install Office 2016 or Other Install Options.Install Office 2016 allows users to install the latest full version of Office (which includes Skype).Other Install Options allow users to install specific components of Office, like Skype.Users should click on whichever install option he/she wishes. If Other Installs is selected, the user must select Skype for Business and then install the option he/she needs.NOTE: Skype for Business Basic is for users who have Office 2016. Skype for Business 2015 is for users who are using an older version of Office.
 - Once the desired installation is selected, one or several files will begin to download to your computer. Follow the installation wizards to complete the install.
- After installation is complete, open the software and login. The username and password are the same as used above to access office.com (w########@usm.edu, SOAR Password).
Web App
The web app attaches directly to the web browser you like to use. It is available for any web browser and does not require a large amount of space on your computer. The Web App is a plugin, not an extension or a Google Application. It attaches directly to the browser on your specific computer and may not follow you if you ‘login’ and sync your browser settings on a different computer. However, the web app small and easy to install, which makes the application somewhat mobile.
Pros
- Full Skype for Business is not required
- Full participation in Meetings as a participant/student
- Can present material if instructor requires you to.
- Recommended for Mac users (rather than the computer/desktop application)
Cons
- For use with Skype Meetings only (no text or voice chat)
- Cannot create/host your own meetings
- Limited tool availability
- Cannot record meetings
The web app is recommended for all student users who only wish to use Skype for Business to view and participate in “live” online sessions or meetings. However, if you wish to use the text and voice chat features, or host your own meetings, you will need to use the computer/desktop application.
Installation Instructions
 Installing the web app uses similar instructions as Joining a Meeting. When you click on a meeting link provided by an instructor (either through Canvas or in an email), a new tab/window will appear in your browser with a link to download the Web App.
NOTE: depending on the web browser you are using, you may have to hold down the CTRL (PC) or Command (Mac) key and then click on the link to open it.
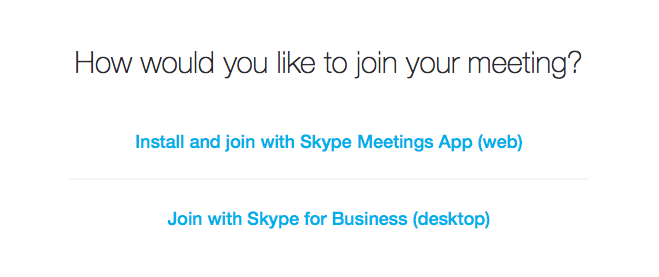
- The new web page displays the following options for opening the meeting (see right).
- Click on the “Install and Join with Skype Meetings App (Web) to install the web app. Your computer will ask you to download and install a file.
Mobile App
Skype for Business also have a mobile app you can download for your phone or tablet. The app is available through both the Play Store (Android) and the App Store (iPhone).
The mobile app is a combination of both the computer/desktop application and the web app. It has the same features and limitations for both Android and IOS devices, including tablets.
NOTE: tablets does not mean tablet computers. An example of a tablet is a Samsung Tab, iPad, or Windows Surface. An example of a tablet computer is a iPad Pro or a Windows Surface Pro.
Pros
- Allows you to watch/participate in “live” sessions, or meetings.
- Works with 4G or better mobile/cell internet connections
- Allows text and voice chat with other Skype for Business users
- Opens meeting links through the phone app (i.e., does not use the mobile browser)
Cons
- You cannot present from a phone/tablet. If your instructor requires you to upload and present your PowerPoint files, you need to use a computer.
- Some tools do not display on the mobile app
- Data rates may apply. If you are using your 4G or better cell phone connection to participate in a session, it will count against your monthly mobile data plan.
- For legal reasons, participating in a “live” session, or meeting, while driving DOES count as texting while driving (which is illegal in most states).
Installation Instructions
Installing the Skype for Business mobile app is similar to installing any other app on your phone. However, make sure you are searching for Skype for Business specifically. There is a regular Skype app that is also free. You can only participate in Skype meetings with the Skype for Business app.
To install Skype for Business on your phone or tablet:
- Open the App Store/Play Store
- Search for Skype for Business
- Install the app onto your device
Joining a Meeting
Joining a Skype for Business meeting requires two things before you can gain access: (1) getting the meeting link from your instructor, either from Canvas or through email, and (2) installing your preferred version of Skype for Business.
After you click on the meeting link, a new window, or tab, will appear in your web browser. This browser/tab will display two options to join the meeting: the web app or the desktop/computer app (see right).
NOTE: if you are using a mobile device, the Skype for Business app will automatically open the session and will not display this menu.
The Web App
Selecting the Web App will open the web application in a new browser window. Please note this is considered a pop-up window. If your browser has disabled pop-up windows, or you are using a pop-up blocking app on your browser, you will need the change these settings to allow the Skype for Business web app.
When the web app window appears, you will be prompted to type in your name. Instructor will prefer you type your first and last name into the text box. The honor system sort of applies here. Realistically, you could type any name into the text box. However, you are encouraged to use your real name in the event instructors are using participation in the session as an attendance grade.
After you have entered your name, you can join the session.
The Desktop/Computer Application
The second menu option provided is the desktop app (see above). This will open the Skype for Business application installed on your computer. This will only work if you have installed the full version of Skype for Business, not regular Skype. If the application on your computer says Skype, and not Skype for Business, you only have regular Skype.
If you select the desktop option, your browser will prompt you to open the desktop application, with either an Allow or Open button. If you are not already logged into Skype for Business, you will need to do so before you can access the meeting.
With the desktop app, you will not have to worry about entering your name. The login is connected to your student email account and your name will carry over from that account.