Previous support guides have discussed how to install Skype for Business and what the Meeting function of Skype could do. The following guide discusses how to schedule meetings and invite students to a meeting. Skype has the ability to create “right now” meeting sessions, or schedule those sessions in advance, and invite groups or individuals to those meetings. This support guide focuses on walking uses through this process.
See attached resource below:
Download PDF VersionScheduling a Meeting
There are two types of meeting that can be created through Skype: Meet Now meetings or Scheduled meetings. The following describes who to create each type.
Creating “Meet Now” Skype Meetings
Skype users have the ability to create a meeting right away, or schedule meetings in advance. The difference is that “right now” meetings are created through Skype, and scheduled meetings are created through Outlook (or Office365).
NOTE: Meet Now meetings can only be created through the computer/desktop application.
 To create a right now meeting, users must have already downloaded, installed, and logged into Skype for Business (please see the Instructor Support Guide – Skype for Business Meetings). Upon logging in, users will see his/her contact list and contact groups. These are people the user has manually added to a contact group for quick access in skype. On this page, there are three icons (see right). These icons are (from left to right):
- Contacts – a manually created list of Skype users for easy user access.
- Conversations – an archive of all conversations, calls, or meetings within Skype.
- Meetings – a list of all meetings or appointments on your Outlook calendar for that day.
NOTE: the computer/desktop application for Mac uses similar navigation, except is a single column and displays: Chats, Meetings, Calls, and Contacts.
![]() The Meetings icon also contains a button labeled Meet Now (see right). Meet Now allows users to create a “right now” meeting through Skype. This type of meeting does not allow users to invite individuals, or groups of people, from outside of the meeting environment, but creators can invite people from within the meeting.
The Meetings icon also contains a button labeled Meet Now (see right). Meet Now allows users to create a “right now” meeting through Skype. This type of meeting does not allow users to invite individuals, or groups of people, from outside of the meeting environment, but creators can invite people from within the meeting.
NOTE: Meet Now for the Mac application is located at the top of the screen under Conversations > Meet Now
Before the creator enters the meeting, he/she is asked to select their audio options. Once in the meeting, they can add participants through the Participants Pane, in the tool bar at the top of the page (see the Instructor Support Guide – Skype for Business Meetings).
Scheduling Skype Meetings
Scheduling meetings provides two advantages over the Meet Now function in Skype: (1) meetings can be created in advanced, and repeated over several days/weeks, and (2) people can be invited to these meetings in advance. Unfortunately, these meetings are not created/setup through Skype. They are scheduled through Outlook, or the Office365 Calendar, which USM students and personnel may access through portal.office.com.
While the functionality is similar in both Outlook and Office365, the remainder of this document will focus on Office365 for information and image support.
NOTE: because O365 is web based, the images and functionality is the same across all platforms.

In Office365, the two apps instructors will use to schedule Skype meetings are Mail and Calendar (see right).
The Calendar app is where meetings will be created, scheduled, and repeated. This is also where instructors will invite others to join the meeting. Since Office365 is not directly attached to Canvas, instructors may add anyone outside of the University to attend a Skype Meeting (i.e., guest lecturers, supervisor, etc). Meeting creators will use Mail to send these invites.
 In the Calendar app, the button to create a new meeting is located at the top of the screen and is labeled New. A new window will appear with a meeting form and new list of buttons (see right).
The forth button from the left, labeled Skype Meeting, allows the instructor to add/create a Skype Meeting and attach it to the calendar. The meeting is attached as a web link in the description of the calendar event (see right).

Instructors must complete the calendar event form to include Start/End dates and times, any repeating options, event reminders, and then click Save.
After the meeting has been saved, the events will populate the instructor’s Outlook and Office365 calendars. These events will not populate the Canvas Calendar.
Adding a skype meeting to Canvas
If an instructor wishes to list these event dates on the Canvas Calendar, they must login to Canvas and add an event to the calendar of a specific course.
![]() In the Canvas Calendar, click on the plus button (+) located at the top of the screen (see right). A new form will appear. Complete the form with the event name, start/end dates and times, and select the course the event will be attached to. Instructors may also click the More Options link and add the meeting link directly to the event details.
In the Canvas Calendar, click on the plus button (+) located at the top of the screen (see right). A new form will appear. Complete the form with the event name, start/end dates and times, and select the course the event will be attached to. Instructors may also click the More Options link and add the meeting link directly to the event details.
Inviting Students/People to Skype Meetings
Inviting students and other people to the meeting can happen in one of two ways: within a meeting through the Participants Panel, or during the meeting schedule process.
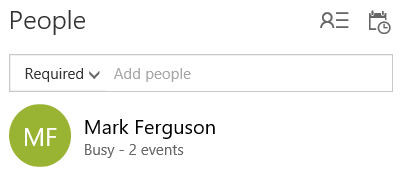
 Within the meeting scheduler, instructors can invite specific people, or groups of people, to the meeting through the People column (see right). The people column lists anyone who is directly invited to the meeting. New people may be added/invited to the meeting by searching their name or email address within the text box at the top of the column.
NOTE: the People column only works for people who are affiliated with the University.
Instructors can add as many individuals as he/she wishes to the meeting through the People column. When additional people are added, the Save button turns into a Send button. This button still saves the event information, but sends each person in the people column an email invite to the meeting though the instructor’s email account.
 Instructors may also invite people not affiliated with the university by sending a weblink to the meeting. The web link appears in the bottom of the Calendar invite (see right). Instructors can right-click on this link and select copy link address (chrome) or copy link location (firefox), then paste that link into an email. These emails may be sent to anyone in the world and gives that person access to the meeting.
If an instructor uses groups/teams within Outlook, or Office365, groups may also be added to the People column. Each person within the group will receive an invite, as if they were invited personally, to the meeting.
NOTE: groups/teams within the Outlook application on a computer may not be available in Office365 and Office365 groups may not be available in the Outlook application.
For more information about setting up groups/teams, see the Instructor Support Guide – Office365 Teams.
