The most common way instructors publish lectures, or lecture materials, to an online course is with PowerPoint. PowerPoint is easy, efficient, and most instructors know how to use it. However, most instructors upload their entire presentation file to the online course, which gives students an editable version of their work. Fortunately, PowerPoint has advanced give instructors’ options for publishing and sharing their work with students.
The following guide focuses on the Recording feature of PowerPoint. Recording is the new iteration of what used to be called PowerPoint Mix. It allows instructors to record audio and video per slide and export the entire presentation as a MP4 video file. The video files can then be uploaded to a streaming service and shared to a Canvas course. This gives instructors the ability to share non-editable works with students and gives online students a similar lecture experience as face-to-face studetents.
This support guide discusses the following:
- Activating the Recording Feature of PowerPoint
- Recording a PowerPoint
- Sharing the Video to a Streaming Service
- Adding the Video to a Canvas Course
Please note the PowerPoint recording feature is currently not available for Mac users. It is also not available for anyone using Microsoft Office 2013 or later. Instructors at USM can download and install the latest version of Microsoft Office at http://portal.office.com
See attached resource below:
Download TutorialActivating Recorder Add-on
 The Recorder feature is available in the latest version of PowerPoint but it is deactivated by default. Before it can be used, the feature must be enabled within Microsoft PowerPoint.
NOTE: this feature is not available with the online version of PowerPoint. It is only available for the computer application and is only available for Windows/PC computers.
To activate this feature:
- Open PowerPoint and start a blank presentation
- Click the File tab
- Select Options
- In the left Column, select Customize Ribbon
- In the column under the Main Tabs pull down, check the box next to Recording (see right)
- Click OK
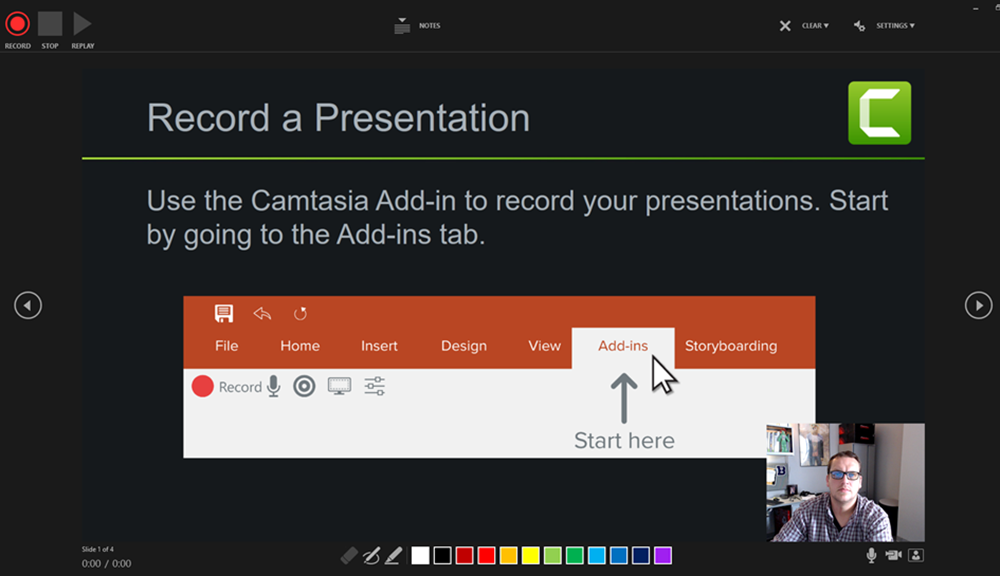
A new tab called Recording will appear in the toolbar at the top of the screen. When you click on this tab, a row of tools will appear. You will use the Record Slide Show tool to record the audio and video per slide.
Recording the Presentation
To start, use the PowerPoint application with the Microsoft Office suite to create your presentation. This would include any text, graphics, or animations you wish to add. Since you are recording audio for each slide, it may also be helpful to create a script for each slide in the notes section.
Return to the first slide of the PowerPoint, click the Record tab, and select the Record Slide Show tool (see below).

A new window will appear with a black background. This window displays the current PowerPoint slide and a webcam area in the lower right corner of the slide (see below).
The record button is in the top left corner of the new window (see above). Below the webcam area are controls to turn the microphone or webcam on/off. Use the Settings option in the top-right corner of the screen to change webcam and microphone options.
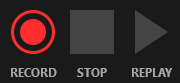 When ready, click the Record button. You will get a countdown and the record button will turn into a Pause button. You can click stop when finished or move to the next slide and continue recording. You will record audio/video per slide, or multiple slides at a single time. The recordings are sectioned by slide. If you need to edit or re-record audio/video you will do so on a per slide basis (i.e., you do not have to re-record the entire presentation). You can also preview your recordings with the Replay button in the slide recorder window (see right).
When finished, close the new window. The webcam image will appear in the bottom-right corner of each slide recorded. You can re-position or resize this image if desired.
When you are ready to publish the presentation to a video, click the Recording tab again and select Export to Video (see above). The default settings are appropriate for most recordings. Click the Create Video button to save the presentation as a video. PowerPoint will prompt you to select a location on your computer where the video will be saved. Follow the prompts and be sure to save the video in a location that you can access later (like Documents, Videos, or Desktop).
Uploading to Stream
To share/add the video to Canvas, you first need to upload the video to Stream. Stream is an Office365 app you have access to. The app is similar to YouTube except it is only available for people associated with USM. You can also upload these videos to Yuja, if you prefer to use that product to stream videos. Instructions for uploading to Yuja are found at: Yuja – Uploading Videos
To upload your videos to Stream, go to portal.office.com. Use you w-number and password to login. The first screen will require you to add your w-number in email form (w######@usm.edu). The redirect to the second username/password box will require your normal login credentials (for SOAR or Canvas).
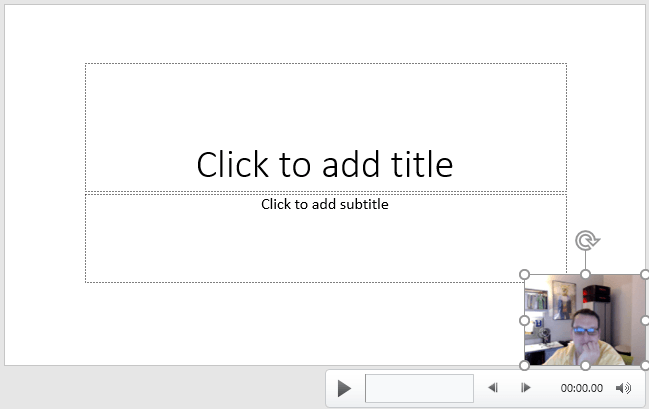
 From the Offce365 home screen, locate and click on the App Launcher icon (see right). This looks like a box made of nine smaller boxes and is in the top-left corner of the screen. Select Stream from the list of apps.
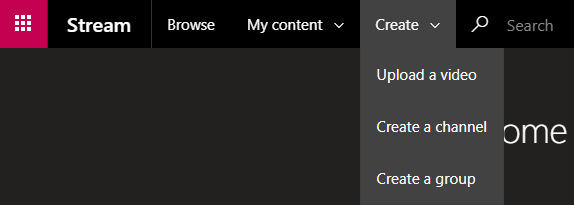
Stream is like YouTube, except it is attached to Office365. You can create a group or channel for storing your videos, or simply upload a video to your account. Click the Create tab at the top of the screen and select Upload a Video (see below). Follow the prompts to complete the upload.
When the video begins to upload, click the Options bar and turn off the Comments option. Click Publish Now when the video has completed processing.
Adding the Presentation to Canvas
 Click the Share button to get the share link for the video (see right). Stream allows you to link the video or embed the video into Canvas.
Linking involves obtaining a share link for the presentation and adding that link directly to the Canvas course. This link will open in a new window and can be placed in multiple locations in a Canvas course.
Embedding involves the copying/pasting of web (HTML) code into a content page within Canvas and adding that content page to a module. Embedding allows students to see the full PowerPoint without having to leave Canvas.
On the share menu, Stream displays the share link by default.
 To link the video to your Canvas course:
- Copy the web link on the share menu.
- Login to Canvas and navigate to the desired course.
- Open Modules.
- Click the plus sign within the module header to add content to the desired module.
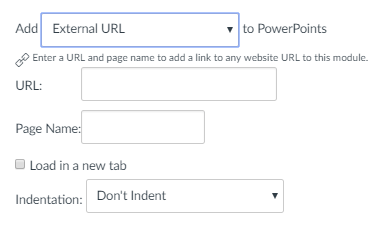
- Select External URL from the pull-down menu.
- Paste the web link into the URL text box.
- Type the video name in the text box next to Page Name (This is what the student will see in the module).
- Check the box next to Load in a New Tab.
- Click Add Item.
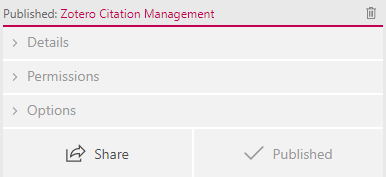
- Publish the URL link in the module.
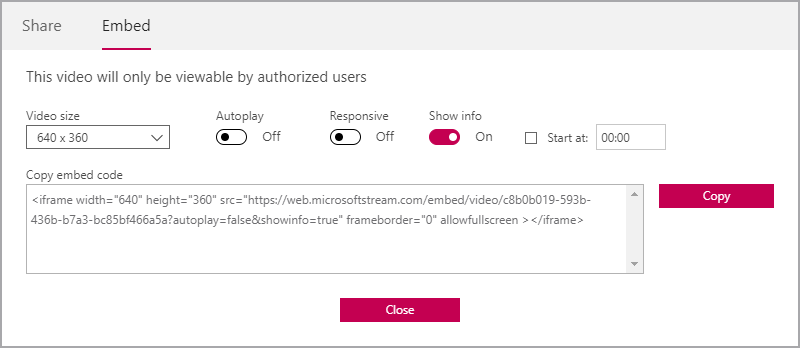
To embed the video into a content page:
- Click the Embed tab (see below).
- Use the pull-down menu under Video Size to select the appropriate size (for Canvas, nothing above 900).
- Click the Responsive option to turn it on.
- Click the Show Info option to turn it off.
- Copy the web (HTML) code from the textbox.
- Login to Canvas and navigate to the desired course.
- Open Modules and click the plus sign in the module header where you wish to place the video.
- Click the pull-down menu and select New Page. A list of all content pages will appear below the pull-down. Select the first option: [New Page]Type the name of the page in the text box that appears, select any desired indenting, and click Add Item. The page will appear at the bottom of the module where it was added. You can drag this page to any location within the module for organizational purposes.
- Click on the name of the page to open it (it will be blank). Canvas HTML Editor Link
- Click the Edit button (located in the top-right corner of the screen).
 In the top-right corner of the text editor, click the HTML Editor link (see right).
- Paste the copied Embed code into the text box.
- Click Save.
- Publish the page in the module to complete the process.
Since the video is hosted on a service included with Office365, students may have to login to Office365 to view the content. This login uses the same username and password as SOAR and Canvas. Once logged in, a play symbol will appear for students to watch the presentation.